最近遇到了一些生产问题涉及到了hystrix,想要了解下底层的原理。hystrix中大量运用了Rxjava的响应式编程,不懂Rxjava,理解起来有点费劲。
基本准备
<?xml version="1.0" encoding="UTF-8"?>
<project xmlns="http://maven.apache.org/POM/4.0.0"
         xmlns:xsi="http://www.w3.org/2001/XMLSchema-instance"
         xsi:schemaLocation="http://maven.apache.org/POM/4.0.0 http://maven.apache.org/xsd/maven-4.0.0.xsd">
    <properties>
        <maven.compiler.source>8</maven.compiler.source>
        <maven.compiler.target>8</maven.compiler.target>
        <spring-boot.version>2.3.12.RELEASE</spring-boot.version>
        <spring-cloud.version>Hoxton.SR11</spring-cloud.version>
    </properties>
        <dependency>
            <groupId>org.springframework.cloud</groupId>
            <artifactId>spring-cloud-starter-netflix-hystrix</artifactId>
        </dependency>

    <dependencyManagement>
        <dependencies>
            <!--导入依赖的pom文件-->
            <!--顺序靠前,先被引入-->
            <dependency>
                <groupId>org.springframework.boot</groupId>
                <artifactId>spring-boot-dependencies</artifactId>
                <version>${spring-boot.version}</version>
                <type>pom</type>
                <scope>provided</scope>
            </dependency>
            <dependency>
                <groupId>org.springframework.cloud</groupId>
                <artifactId>spring-cloud-dependencies</artifactId>
                <version>${spring-cloud.version}</version>
                <type>pom</type>
                <scope>import</scope>
            </dependency>
        </dependencies>
    </dependencyManagement>
</project>
启用hystrix
//在主类上添加
@EnableHystrix

我们看下源码
@Target({ElementType.TYPE})
@Retention(RetentionPolicy.RUNTIME)
@Documented
@Inherited
@EnableCircuitBreaker
public @interface EnableHystrix {
}

最终@EnableHystrix继承了@EnableCircuitBreaker

@Target(ElementType.TYPE)
@Retention(RetentionPolicy.RUNTIME)
@Documented
@Inherited
@Import(EnableCircuitBreakerImportSelector.class)
public @interface EnableCircuitBreaker {

}
按照之前的模式,我们一定是去分析EnableCircuitBreakerImportSelector,至于如何执行@Import这里不做过多说明,之前已经讲过,感兴趣的看下这里:具体代码在ConfigurationClassParser.processImports里的String[] importClassNames = selector.selectImports(currentSourceClass.getMetadata());
通过EnableCircuitBreakerImportSelector导入HystrixCircuitBreakerConfiguration
//优先级不是特别高,毕竟是运行时的切面
@Order(Ordered.LOWEST_PRECEDENCE - 100)
public class EnableCircuitBreakerImportSelector
        extends SpringFactoryImportSelector<EnableCircuitBreaker> {

    @Override
    protected boolean isEnabled() {
        //默认是开启的
        return getEnvironment().getProperty("spring.cloud.circuit.breaker.enabled",
                Boolean.class, Boolean.TRUE);
    }
}
Import导入后,会通过selectImports从配置文件里加载对应的类 org.springframework.cloud.client.circuitbreaker.EnableCircuitBreaker
public abstract class SpringFactoryImportSelector<T>
        implements DeferredImportSelector, BeanClassLoaderAware, EnvironmentAware {
    //将泛型T解析为this.annotationClass
    protected SpringFactoryImportSelector() {
        this.annotationClass = (Class<T>) GenericTypeResolver.resolveTypeArgument(this.getClass(), SpringFactoryImportSelector.class);
    }
    @Override
    public String[] selectImports(AnnotationMetadata metadata) {
        //通过SpringFactoriesLoader.loadFactoryNames从spring.factories中获取org.springframework.cloud.client.circuitbreaker.EnableCircuitBreaker对应的配置
        List<String> factories = new ArrayList<>(new LinkedHashSet<>(SpringFactoriesLoader.loadFactoryNames(this.annotationClass, this.beanClassLoader)));
    }
}
具体到最后对应的是2.2.8.RELEASE/spring-cloud-netflix-hystrix-2.2.8.RELEASE.jar!/META-INF/spring.factories
spring.factories文件的内容
org.springframework.boot.autoconfigure.EnableAutoConfiguration=\
org.springframework.cloud.netflix.hystrix.HystrixAutoConfiguration,\
org.springframework.cloud.netflix.hystrix.HystrixCircuitBreakerAutoConfiguration,\
org.springframework.cloud.netflix.hystrix.ReactiveHystrixCircuitBreakerAutoConfiguration,\
org.springframework.cloud.netflix.hystrix.security.HystrixSecurityAutoConfiguration

org.springframework.cloud.client.circuitbreaker.EnableCircuitBreaker=\
org.springframework.cloud.netflix.hystrix.HystrixCircuitBreakerConfiguration
在@SpringBootApplication中,对@EnableAutoConfiguration有引用,所以一启动,就会加载HystrixAutoConfiguration这些类
@SpringBootConfiguration
@EnableAutoConfiguration
@ComponentScan(excludeFilters = { @Filter(type = FilterType.CUSTOM, classes = TypeExcludeFilter.class),
        @Filter(type = FilterType.CUSTOM, classes = AutoConfigurationExcludeFilter.class) })
public @interface SpringBootApplication {}
HystrixCircuitBreakerConfiguration解析
@Configuration(proxyBeanMethods = false)
public class HystrixCircuitBreakerConfiguration {
    //核心是这个切面
    @Bean
    public HystrixCommandAspect hystrixCommandAspect() {
        return new HystrixCommandAspect();
    }
    ....
}
在HystrixCommandAspect中主要是对HystrixCommand和HystrixCollapser这两个注解进行处理
@Aspect
public class HystrixCommandAspect {
    static {
        //通过静态方法将两个注解的两个工厂实例化
        META_HOLDER_FACTORY_MAP = ImmutableMap.<HystrixPointcutType, MetaHolderFactory>builder()
            .put(HystrixPointcutType.COMMAND, new CommandMetaHolderFactory())
            .put(HystrixPointcutType.COLLAPSER, new CollapserMetaHolderFactory())
            .build();
    }
    //定义切入点注解HystrixCommand
    @Pointcut("@annotation(com.netflix.hystrix.contrib.javanica.annotation.HystrixCommand)")
    public void hystrixCommandAnnotationPointcut() {
    }
    //定义切入点注解HystrixCollapser
    @Pointcut("@annotation(com.netflix.hystrix.contrib.javanica.annotation.HystrixCollapser)")
    public void hystrixCollapserAnnotationPointcut() {
    }

    @Around("hystrixCommandAnnotationPointcut() || hystrixCollapserAnnotationPointcut()")
    public Object methodsAnnotatedWithHystrixCommand(final ProceedingJoinPoint joinPoint) throws Throwable {
        //获取目标方法
        Method method = getMethodFromTarget(joinPoint);
        Validate.notNull(method, "failed to get method from joinPoint: %s", joinPoint);
        //只处理这两种注解标注的方法
        if (method.isAnnotationPresent(HystrixCommand.class) && method.isAnnotationPresent(HystrixCollapser.class)) {
            throw new IllegalStateException("method cannot be annotated with HystrixCommand and HystrixCollapser " +
                    "annotations at the same time");
        }
        //获取MetaHolderFactory不同实现的factory
        MetaHolderFactory metaHolderFactory = META_HOLDER_FACTORY_MAP.get(HystrixPointcutType.of(method));
        //获取目标方法的的元数据,方法签名,参数等
        MetaHolder metaHolder = metaHolderFactory.create(joinPoint);
        /**
         * 创建处理器CommandCollapser 或 GenericCommand (同步) 或GenericObservableCommand(异步)
         * GenericCommand里有很多super,最终通过HystrixCommandBuilderFactory.getInstance().create(metaHolder) 构建了一个HystrixCommandBuilder作为GenericCommad的参数
         * new  GenericCommand 通过super到AbstractHystrixCommand,
         * AbstractHystrixCommand 通过super到HystrixCommand,
         * HystrixCommand最终到了AbstractCommand  一路传递
         * 一会在AbstractCommand中分析下
         */
        HystrixInvokable invokable = HystrixCommandFactory.getInstance().create(metaHolder);
        //根据返回值推断执行类型
        ExecutionType executionType = metaHolder.isCollapserAnnotationPresent() ?
                metaHolder.getCollapserExecutionType() : metaHolder.getExecutionType();
        //返回结果
        Object result;
        try {
            //不使用observable模式
            if (!metaHolder.isObservable()) {
                //execute执行
                result = CommandExecutor.execute(invokable, executionType, metaHolder);
            } else {
                result = executeObservable(invokable, executionType, metaHolder);
            }
        } catch (HystrixBadRequestException e) {
            throw e.getCause();
        } catch (HystrixRuntimeException e) {
            throw hystrixRuntimeExceptionToThrowable(metaHolder, e);
        }
        return result;
    }

    //HystrixCommand的时候MetaHolder的创建
    private static class CommandMetaHolderFactory extends MetaHolderFactory {
        @Override
        public MetaHolder create(Object proxy, Method method, Object obj, Object[] args, final ProceedingJoinPoint joinPoint) {
            //获取注解HystrixCommand
            HystrixCommand hystrixCommand = method.getAnnotation(HystrixCommand.class);
            //根据返回结果推断任务类型,可以知道以哪种方式执行
            ExecutionType executionType = ExecutionType.getExecutionType(method.getReturnType());
            MetaHolder.Builder builder = metaHolderBuilder(proxy, method, obj, args, joinPoint);
            if (isCompileWeaving()) {
                builder.ajcMethod(getAjcMethodFromTarget(joinPoint));
            }
            //这里没有多少参数,最重要的一个hystrixCommand,你在注解里加了什么
            return builder.defaultCommandKey(method.getName())
                            .hystrixCommand(hystrixCommand)
                            .observableExecutionMode(hystrixCommand.observableExecutionMode())  //执行模式
                            .executionType(executionType) //执行方式
                            .observable(ExecutionType.OBSERVABLE == executionType)
                            .build();
        }
    }
}

//在枚举ExecutionType类里
    public static ExecutionType getExecutionType(Class<?> type) {
        if (Future.class.isAssignableFrom(type)) {
            return ExecutionType.ASYNCHRONOUS;
        } else if (Observable.class.isAssignableFrom(type)) {
            return ExecutionType.OBSERVABLE;
        } else {
            return ExecutionType.SYNCHRONOUS;
        }
    }
我们重点分析下同步处理,通过代码我们可以看到HystrixInvokable 是 GenericCommand,我们同步里的看下 CommandExecutor.execute(invokable, executionType, metaHolder)
public class CommandExecutor {
    public static Object execute(HystrixInvokable invokable, ExecutionType executionType, MetaHolder metaHolder) throws RuntimeException {
        Validate.notNull(invokable);
        Validate.notNull(metaHolder);

        switch (executionType) {
            case SYNCHRONOUS: {
                //重点看同步处理这个,先把GenericCommand 转成HystrixExecutable 再执行execute
                return castToExecutable(invokable, executionType).execute();
            }
            case ASYNCHRONOUS: {
                HystrixExecutable executable = castToExecutable(invokable, executionType);
                if (metaHolder.hasFallbackMethodCommand()
                        && ExecutionType.ASYNCHRONOUS == metaHolder.getFallbackExecutionType()) {
                    return new FutureDecorator(executable.queue());
                }
                return executable.queue();
            }
            case OBSERVABLE: {
                HystrixObservable observable = castToObservable(invokable);
                return ObservableExecutionMode.EAGER == metaHolder.getObservableExecutionMode() ? observable.observe() : observable.toObservable();
            }
            default:
                throw new RuntimeException("unsupported execution type: " + executionType);
        }
    }
}
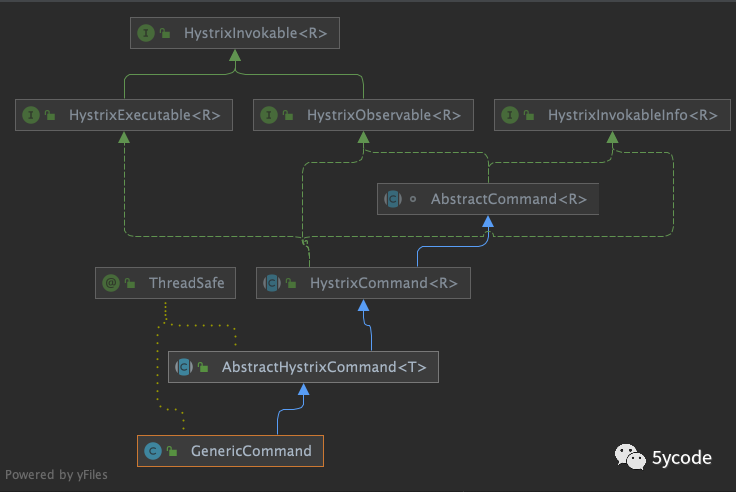
我们先看下类关系

通过GenericCommand一层层的往上翻,最终定位到HystrixCommand有个execute()
HystrixCommand
public abstract class HystrixCommand<R> extends AbstractCommand<R> implements HystrixExecutable<R>, HystrixInvokableInfo<R>, HystrixObservable<R> {
    //同步执行
    public R execute() {
        try {
            //通过queue().get()来同步执行
            return queue().get();
        } catch (Exception e) {
            throw Exceptions.sneakyThrow(decomposeException(e));
        }
    }
   //异步执行,什么时候get(),由调用者决定,get()的时候会阻塞
   public Future<R> queue() {
        //核心处理,最终定位到了AbstractCommand里的toObservable()里
        final Future<R> delegate = toObservable().toBlocking().toFuture();

        final Future<R> f = new Future<R>() {
            .....
            @Override
            public R get() throws InterruptedException, ExecutionException {
                return delegate.get();
            }

            @Override
            public R get(long timeout, TimeUnit unit) throws InterruptedException, ExecutionException, TimeoutException {
                return delegate.get(timeout, unit);
            }

        };
        //特殊处理了下,已经执行完了,get()也不会阻塞了
        if (f.isDone()) {
            try {
                f.get();
                return f;
            } catch (Exception e) {
                ...
            }
        }
        return f;
    }
}
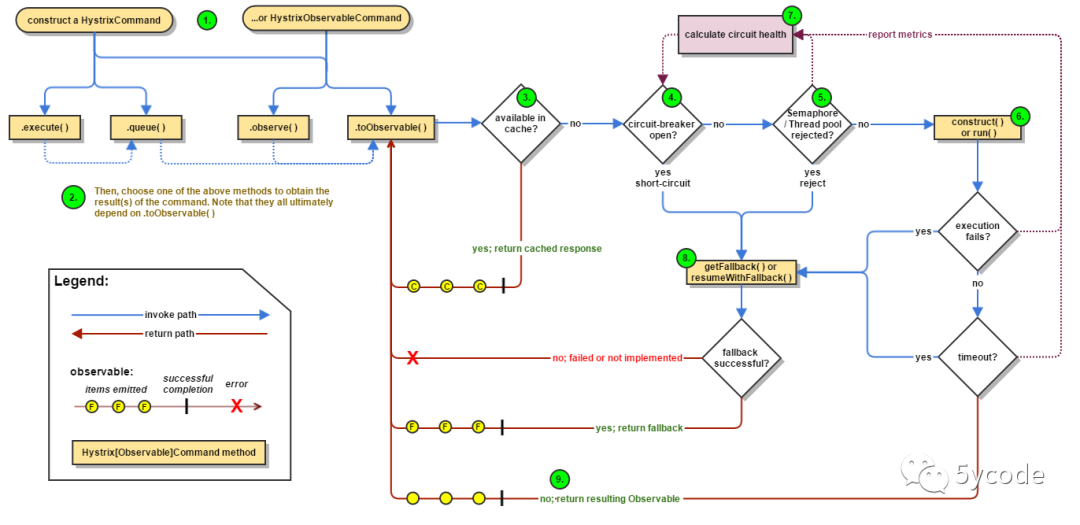
我们看下官方的流程图:(来源地址:https://github.com/Netflix/Hystrix/wiki/How-it-Works)通过代码,我们也可以看到确实到了这里

AbstractCommand
abstract class AbstractCommand<R> implements HystrixInvokableInfo<R>, HystrixObservable<R> {
   // 一个 new GenericCommand 最终走到了这里,参数都包装到了这里,只是从GenericCommand 来说
    protected AbstractCommand(HystrixCommandGroupKey group, HystrixCommandKey key, HystrixThreadPoolKey threadPoolKey, HystrixCircuitBreaker circuitBreaker, HystrixThreadPool threadPool,
            HystrixCommandProperties.Setter commandPropertiesDefaults, HystrixThreadPoolProperties.Setter threadPoolPropertiesDefaults,
            HystrixCommandMetrics metrics, TryableSemaphore fallbackSemaphore, TryableSemaphore executionSemaphore,
            HystrixPropertiesStrategy propertiesStrategy, HystrixCommandExecutionHook executionHook) {
        //设置group
        this.commandGroup = initGroupKey(group);
        //正常为方法名,不设置,就是类
        this.commandKey = initCommandKey(key, getClass());
        //这里做了优化,将组装好的CommandProperties放入了ConcurrentHashMap缓存了起来(如果是动态生成方法溢出?)
        this.properties = initCommandProperties(this.commandKey, propertiesStrategy, commandPropertiesDefaults);
        //初始化线程池的key,如果为null,则用groupKey.name()
        this.threadPoolKey = initThreadPoolKey(threadPoolKey, this.commandGroup, this.properties.executionIsolationThreadPoolKeyOverride().get());
        //初始化指标,以commandKey缓存
        this.metrics = initMetrics(metrics, this.commandGroup, this.threadPoolKey, this.commandKey, this.properties);
        //初始化断路器,也是以commandKey缓存
        this.circuitBreaker = initCircuitBreaker(this.properties.circuitBreakerEnabled().get(), circuitBreaker, this.commandGroup, this.commandKey, this.properties, this.metrics);
        //初始化线程池,传入有就用,没有就创建一个缓存,还是commandKey维度,最终是通过concurrencyStrategy.getThreadPool(threadPoolKey, properties)创建
        this.threadPool = initThreadPool(threadPool, this.threadPoolKey, threadPoolPropertiesDefaults);

        //Strategies from plugins
        this.eventNotifier = HystrixPlugins.getInstance().getEventNotifier();
        this.concurrencyStrategy = HystrixPlugins.getInstance().getConcurrencyStrategy();
        HystrixMetricsPublisherFactory.createOrRetrievePublisherForCommand(this.commandKey, this.commandGroup, this.metrics, this.circuitBreaker, this.properties);
        this.executionHook = initExecutionHook(executionHook);

        this.requestCache = HystrixRequestCache.getInstance(this.commandKey, this.concurrencyStrategy);
        this.currentRequestLog = initRequestLog(this.properties.requestLogEnabled().get(), this.concurrencyStrategy);

        /* fallback semaphore override if applicable */
        this.fallbackSemaphoreOverride = fallbackSemaphore;

        /* execution semaphore override if applicable */
        this.executionSemaphoreOverride = executionSemaphore;
    }
    //核心处理逻辑
    public Observable<R> toObservable() {
        //拿到当前的对象
        final AbstractCommand<R> _cmd = this;
        /**
         *  terminateCommandCleanup  用于中断命令清理的回调函数
         *  unsubscribeCommandCleanup 取消订阅命令的清理回调函数
         *  applyHystrixSemantics  创建带执行逻辑的Observable,用于订阅后回调
         *  wrapWithAllOnNextHooks onNext执行的钩子
         *  fireOnCompletedHook  完成后触发的钩子
         */
        final Func0<Observable<R>> applyHystrixSemantics = new Func0<Observable<R>>() {
            @Override
            public Observable<R> call() {
                //没有订阅不执行
                if (commandState.get().equals(CommandState.UNSUBSCRIBED)) {
                    return Observable.never();
                }
                //执行
                return applyHystrixSemantics(_cmd);
            }
        };
        //onNext执行后的钩子
        final Func1<R, R> wrapWithAllOnNextHooks = new Func1<R, R>() {
            @Override
            public R call(R r) {
                R afterFirstApplication = r;

                try {
                    afterFirstApplication = executionHook.onComplete(_cmd, r);
                } catch (Throwable hookEx) {
                    logger.warn("Error calling HystrixCommandExecutionHook.onComplete", hookEx);
                }

                try {
                    return executionHook.onEmit(_cmd, afterFirstApplication);
                } catch (Throwable hookEx) {
                    logger.warn("Error calling HystrixCommandExecutionHook.onEmit", hookEx);
                    return afterFirstApplication;
                }
            }
        };
        //通过defer创建Observable
        return Observable.defer(new Func0<Observable<R>>() {
            //创建观察者,观察者的执行,得由subscribe()触发
            @Override
            public Observable<R> call() {
                 //通过cas来判断命令状态,初始为NOT_STARTED,如果进来不是NOT_STARTED说明已经有别线程执行了,就抛异常
                if (!commandState.compareAndSet(CommandState.NOT_STARTED, CommandState.OBSERVABLE_CHAIN_CREATED)) {
                    IllegalStateException ex = new IllegalStateException("This instance can only be executed once. Please instantiate a new instance.");
                    throw new HystrixRuntimeException(FailureType.BAD_REQUEST_EXCEPTION, _cmd.getClass(), getLogMessagePrefix() + " command executed multiple times - this is not permitted.", ex, null);
                }
                //命令开始时间
                commandStartTimestamp = System.currentTimeMillis();
                if (properties.requestLogEnabled().get()) {
                    // 不管发生什么都要用日志记录下来
                    if (currentRequestLog != null) {
                        currentRequestLog.addExecutedCommand(_cmd);
                    }
                }
                //是否允许请求缓存,
                final boolean requestCacheEnabled = isRequestCachingEnabled();
                //cacheKey是需要设置@CacheKey 在HystrixCacheKeyGenerator中会把方法和指定的key的value进行拼接
                final String cacheKey = getCacheKey();

                //允许请求缓存的情况下,先从缓存中获取,最终缓存用的是ConcurrentHashMap
                if (requestCacheEnabled) {
                    HystrixCommandResponseFromCache<R> fromCache = (HystrixCommandResponseFromCache<R>) requestCache.get(cacheKey);
                    if (fromCache != null) {
                        isResponseFromCache = true;
                        return handleRequestCacheHitAndEmitValues(fromCache, _cmd);
                    }
                }
                //通过defer创建Observable
                Observable<R> hystrixObservable = Observable.defer(applyHystrixSemantics).map(wrapWithAllOnNextHooks);

                Observable<R> afterCache;

                // 开启缓存的情况下,重新放入缓存
                if (requestCacheEnabled && cacheKey != null) {
                    // 对hystrixObservable进行包装后放入缓存
                    HystrixCachedObservable<R> toCache = HystrixCachedObservable.from(hystrixObservable, _cmd);
                    HystrixCommandResponseFromCache<R> fromCache = (HystrixCommandResponseFromCache<R>) requestCache.putIfAbsent(cacheKey, toCache);

                } else {
                    afterCache = hystrixObservable;
                }

                return afterCache
                        .doOnTerminate(terminateCommandCleanup)    //中断命令清理
                        .doOnUnsubscribe(unsubscribeCommandCleanup) // 不订阅也清理
                        .doOnCompleted(fireOnCompletedHook);//完成触发的钩子
            }
        });
    }

    private Observable<R> applyHystrixSemantics(final AbstractCommand<R> _cmd) {
        //开始执行
        executionHook.onStart(_cmd);

        //断路器允许执行,里面有好多逻辑,具体看下面的解说
        if (circuitBreaker.allowRequest()) {
            //信号量处理(前提是你配置的是信号量处理机制,如果使用线程池则使用TryableSemaphoreNoOp,申请信号量为true)
            final TryableSemaphore executionSemaphore = getExecutionSemaphore();
            final AtomicBoolean semaphoreHasBeenReleased = new AtomicBoolean(false);
            //执行完释放信号量
            final Action0 singleSemaphoreRelease = new Action0() {
                @Override
                public void call() {
                    if (semaphoreHasBeenReleased.compareAndSet(false, true)) {
                        executionSemaphore.release();
                    }
                }
            };

            final Action1<Throwable> markExceptionThrown = new Action1<Throwable>() {
                @Override
                public void call(Throwable t) {
                    eventNotifier.markEvent(HystrixEventType.EXCEPTION_THROWN, commandKey);
                }
            };
            //申请信号量
            if (executionSemaphore.tryAcquire()) {
                try {
                    //设置调用时间
                    executionResult = executionResult.setInvocationStartTime(System.currentTimeMillis());
                    return executeCommandAndObserve(_cmd)  //执行命令,这块是核心
                            .doOnError(markExceptionThrown) //异常处理
                            .doOnTerminate(singleSemaphoreRelease)//中断时,信号量释放
                            .doOnUnsubscribe(singleSemaphoreRelease);//不订阅,也释放信号量
                } catch (RuntimeException e) {
                    return Observable.error(e);
                }
            } else {
                //申请不到信号量就直接执行Fallback
                return handleSemaphoreRejectionViaFallback();
            }
        } else {
            //断路器不允许执行,就直接执行Fallback方法
            return handleShortCircuitViaFallback();
        }
    }

    private Observable<R> executeCommandAndObserve(final AbstractCommand<R> _cmd) {
        //HystrixRequestContext hystrix线程的上下文,可以通过它传递一些内容,防止异步过程中数据丢失
        final HystrixRequestContext currentRequestContext = HystrixRequestContext.getContextForCurrentThread();
        /**
         *  又是定义一堆Action和Func
         *  markEmits 用于onNext回调
         *  markOnCompleted 用于完成后处理,会采样一个SUCCESS事件
         *  handleFallback,有返回结果 用于处理Fallback,
         *  setRequestContext 设置请求上下文
         *  markEmits、markOnCompleted、handleFallback都会产生一个事件
         */

        Observable<R> execution;
        //执行命令
        if (properties.executionTimeoutEnabled().get()) {
            //配置超时时间的情况下会加一个HystrixObservableTimeoutOperator 这里会发送超时事件
            execution = executeCommandWithSpecifiedIsolation(_cmd).lift(new HystrixObservableTimeoutOperator<R>(_cmd));
        } else {
            execution = executeCommandWithSpecifiedIsolation(_cmd);
        }

        return execution.doOnNext(markEmits)
                .doOnCompleted(markOnCompleted)
                .onErrorResumeNext(handleFallback)
                .doOnEach(setRequestContext);
    }

    private Observable<R> executeCommandWithSpecifiedIsolation(final AbstractCommand<R> _cmd) {
        //真正执行逻辑,区分了线程池和信号量
        if (properties.executionIsolationStrategy().get() == ExecutionIsolationStrategy.THREAD) {
            //
            return Observable.defer(new Func0<Observable<R>>() {
                @Override
                public Observable<R> call() {
                    executionResult = executionResult.setExecutionOccurred();
                    if (!commandState.compareAndSet(CommandState.OBSERVABLE_CHAIN_CREATED, CommandState.USER_CODE_EXECUTED)) {
                        return Observable.error(new IllegalStateException("execution attempted while in state : " + commandState.get().name()));
                    }

                    metrics.markCommandStart(commandKey, threadPoolKey, ExecutionIsolationStrategy.THREAD);

                    if (isCommandTimedOut.get() == TimedOutStatus.TIMED_OUT) {

                        return Observable.error(new RuntimeException("timed out before executing run()"));
                    }
                    //设置线程状态,计数,并执行
                    if (threadState.compareAndSet(ThreadState.NOT_USING_THREAD, ThreadState.STARTED)) {
                        //计数
                        HystrixCounters.incrementGlobalConcurrentThreads();
                        threadPool.markThreadExecution();

                        endCurrentThreadExecutingCommand = Hystrix.startCurrentThreadExecutingCommand(getCommandKey());
                        executionResult = executionResult.setExecutedInThread();
                        try {
                            executionHook.onThreadStart(_cmd);
                            executionHook.onRunStart(_cmd);
                            executionHook.onExecutionStart(_cmd);
                            return getUserExecutionObservable(_cmd);
                        } catch (Throwable ex) {
                            return Observable.error(ex);
                        }
                    } else {

                        return Observable.error(new RuntimeException("unsubscribed before executing run()"));
                    }
                }
            }).doOnTerminate(new Action0() {
                @Override
                public void call() {
                    //异常处理
                    if (threadState.compareAndSet(ThreadState.STARTED, ThreadState.TERMINAL)) {
                        handleThreadEnd(_cmd);
                    }
                }
            }).doOnUnsubscribe(new Action0() {
                @Override
                public void call() {
                    //未订阅处理
                    if (threadState.compareAndSet(ThreadState.STARTED, ThreadState.UNSUBSCRIBED)) {
                        handleThreadEnd(_cmd);
                    }
                }
            }).subscribeOn(threadPool.getScheduler(new Func0<Boolean>() {
                @Override
                public Boolean call() {
                    return properties.executionIsolationThreadInterruptOnTimeout().get() && _cmd.isCommandTimedOut.get() == TimedOutStatus.TIMED_OUT;
                }
            }));
        } else {
            //信号量的执行
            return Observable.defer(new Func0<Observable<R>>() {
                @Override
                public Observable<R> call() {
                    executionResult = executionResult.setExecutionOccurred();
                    if (!commandState.compareAndSet(CommandState.OBSERVABLE_CHAIN_CREATED, CommandState.USER_CODE_EXECUTED)) {
                        return Observable.error(new IllegalStateException("execution attempted while in state : " + commandState.get().name()));
                    }

                    metrics.markCommandStart(commandKey, threadPoolKey, ExecutionIsolationStrategy.SEMAPHORE);
                    // semaphore isolated
                    // store the command that is being run
                    endCurrentThreadExecutingCommand = Hystrix.startCurrentThreadExecutingCommand(getCommandKey());
                    try {
                        executionHook.onRunStart(_cmd);
                        executionHook.onExecutionStart(_cmd);
                        return getUserExecutionObservable(_cmd);  //the getUserExecutionObservable method already wraps sync exceptions, so this shouldn't throw
                    } catch (Throwable ex) {
                        //If the above hooks throw, then use that as the result of the run method
                        return Observable.error(ex);
                    }
                }
            });
        }
    }
}
断路器
public interface HystrixCircuitBreaker {
    //初始化实现
    public static class Factory {
        public static HystrixCircuitBreaker getInstance(HystrixCommandKey key, HystrixCommandGroupKey group, HystrixCommandProperties properties, HystrixCommandMetrics metrics) {
            // 缓存中有,就直接返回
            HystrixCircuitBreaker previouslyCached = circuitBreakersByCommand.get(key.name());
            if (previouslyCached != null) {
                return previouslyCached;
            }

            // 第一次进来,没有就初始化并缓存到map里

            HystrixCircuitBreaker cbForCommand = circuitBreakersByCommand.putIfAbsent(key.name(), new HystrixCircuitBreakerImpl(key, group, properties, metrics));
            if (cbForCommand == null) {
                // this means the putIfAbsent step just created a new one so let's retrieve and return it
                return circuitBreakersByCommand.get(key.name());
            } else {
                return cbForCommand;
            }
        }
    }
    //断路器实现
    static class HystrixCircuitBreakerImpl implements HystrixCircuitBreaker {
        //hystrix 的配置都在HystrixCommandProperties
        @Override
        public boolean allowRequest() {
            if (properties.circuitBreakerForceOpen().get()) {
                //强制打开断路器,就直接返回,这个时候就熔断了
                return false;
            }
            //断路器关闭的情况下,再次验证
            if (properties.circuitBreakerForceClosed().get()) {
                isOpen();
                //不管本次什么样的结果,至少我进来的是开着的,设置为关闭以后,我还得继续执行
                return true;
            }
            return !isOpen() || allowSingleTest();
        }
        @Override
        public boolean isOpen() {
            //如果是open的,拦截,直接返回true
            if (circuitOpen.get()) {
                return true;
            }

            /**
             * HealthCounts里存储的是一个滑动窗口期间的请求数。
             *  totalCount 总请求数 包含:数(失败+成功+超时+ threadPoolRejected +信号量拒绝)
             *  errorCount 异常数据 刨除成功就是失败
             *  errorPercentage  异常百分比= errorCount/totalCount *100;
             */
            HealthCounts health = metrics.getHealthCounts();

            //如果总请求数小于配置的值,不拦截,配置值是hystrix.对应的comandKey.circuitBreaker.requestVolumeThreshold  默认值是20
            if (health.getTotalRequests() < properties.circuitBreakerRequestVolumeThreshold().get()) {
                return false;
            }
            //如果异常率小于配置的值,也不拦截,配置值是hystrix.对应的comandKey.circuitBreaker.errorThresholdPercentage 默认值是50,也就是有50%异常,就熔断
            if (health.getErrorPercentage() < properties.circuitBreakerErrorThresholdPercentage().get()) {
                return false;
            } else {
                // 异常比率较高,就设置断路器为open
                if (circuitOpen.compareAndSet(false, true)) {
                    // 设置断路器器打开的时间
                    circuitOpenedOrLastTestedTime.set(System.currentTimeMillis());
                    return true;
                } else {
                    //走到这里,说明本线程没有设置成功,别的线程已经打开了断路器,直接返回
                    return true;
                }
            }
        }

    }
    }
}
- 初始化时通过ConcurrentHashMap来缓存HystrixCircuitBreaker来提升性能。
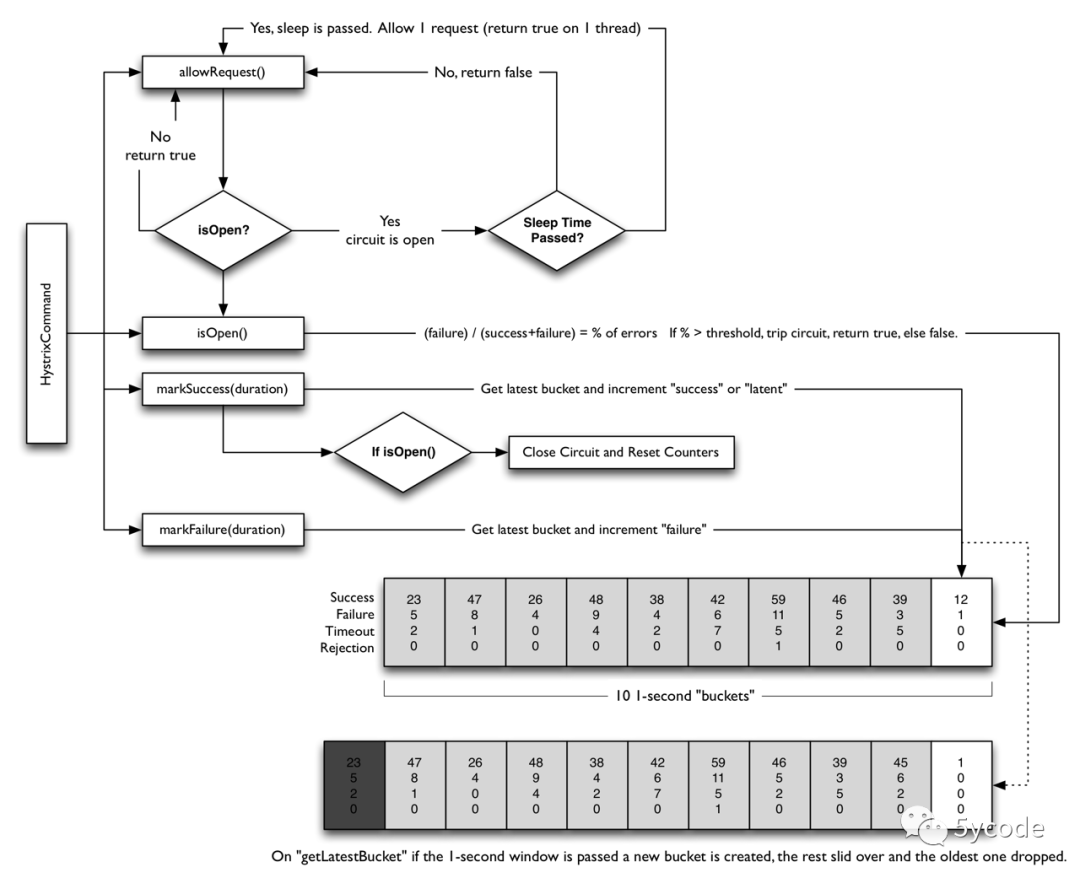
断路器的三种状态:转化关系如下:

断路器初始是Closed状态,如果调用持续出错或者超时,断路器会进入Open状态,熔断请求,后续的一段时间内所有的调用都会触发fallback
-
Open 状态:请求不再进行调用当前服务,内部设置时钟一般为MTTR(平均故障处理时间),当打开时长达到所设时钟则进入半熔断状态
-
Closed 关闭:路器器关闭不会对服务进行熔断部分请求
-
Half Open 半开:根据规则调用当前服务,如果请求成功且符合规则则认为当前服务恢复正常,关闭熔断
看下官方的流程图 在官方:https://github.com/Netflix/Hystrix/wiki/How-it-Works 有图有说明

-
断路器是以commandKey为维度
-
断路器是打开状态,直接熔断
-
在窗口期内,如果请求的量大于设置的值,熔断(默认是10秒超过20个请求)
-
如果异常率大于配置的值,熔断(默认是10秒超过50%的失败)
-
一段时间之后,这个断路器是掰开状态,会允许一个请求进来,如果成功,断路器会关闭
ps: HystrixCommand 的配置属性在类:HystrixCommandProperties
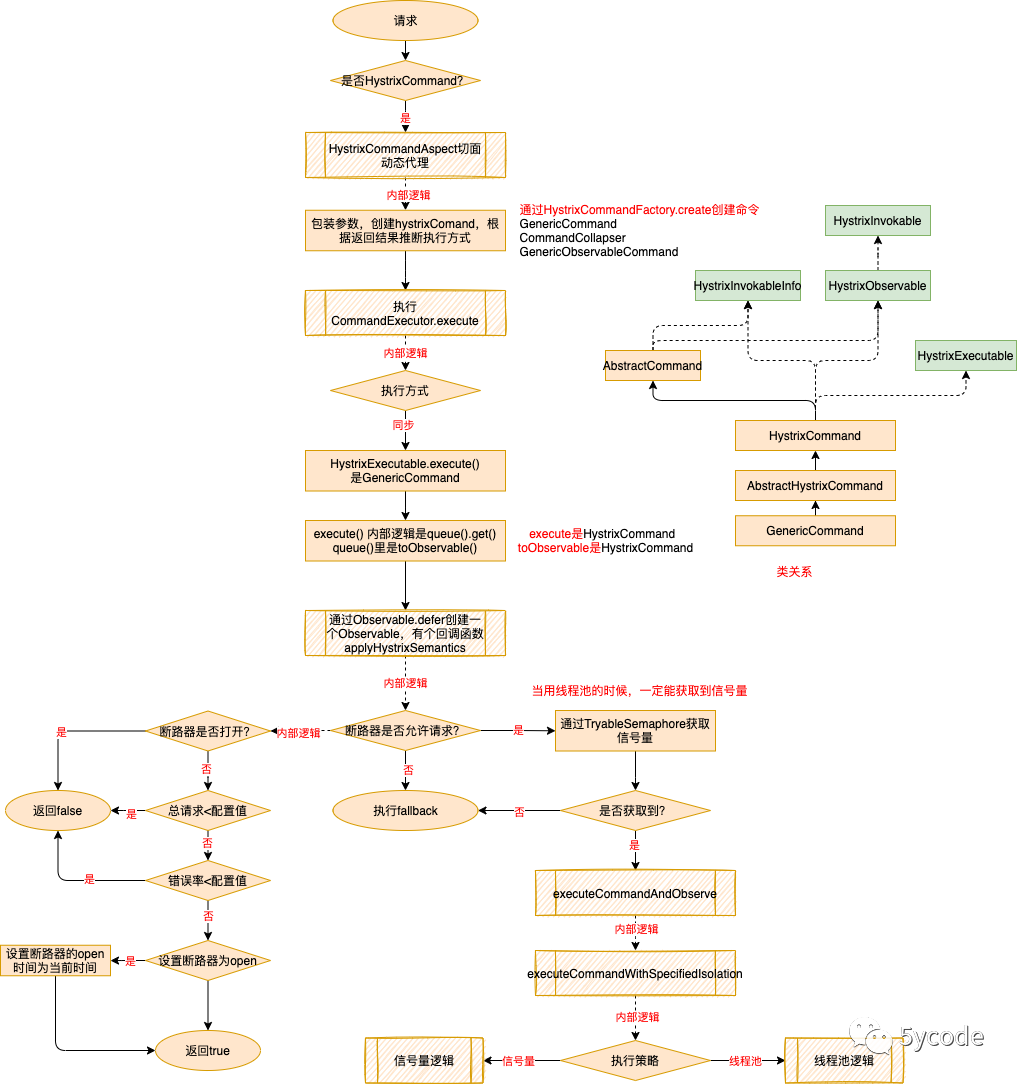
最后上下逻辑图

同时,在hystrix-core的jar包com.netflix.hystrix.metric.consumer下,有很多的HystrixEvent的消费流,这些根据配置执行不同的限流手段,有滑动窗口,有令牌桶,这些流都会在HystrixCommandMetrics实例化的时候启动。如果想了解这一块可以看下HystrixConfigurationStream和HystrixCommandMetrics。后期也会针对这块分析下。
流程是理顺了,但是整起来磕磕绊绊的,里面一层套一层的,想要真正的了解它的底层运作,需要好好的了解下Rxjava,后续研究下再分享。
